Farrier Takeaways

  • A hoof cast stabilizes the hoof after wall resection, relieves the distal phalanx and the solar dermis to help the sole recover and protect the distal phalanx.
  • If extensive hoof wall resection is performed, the bearing function of the removed hoof wall needs to be substituted. It is critical to avoid sole pressure and harming the distal phalanx.
  • A hoof cast can cause negative side effects such as restriction of hoof movement, heel contraction, narrowing of the hoof and irritation of the bulbs and soft tissue.

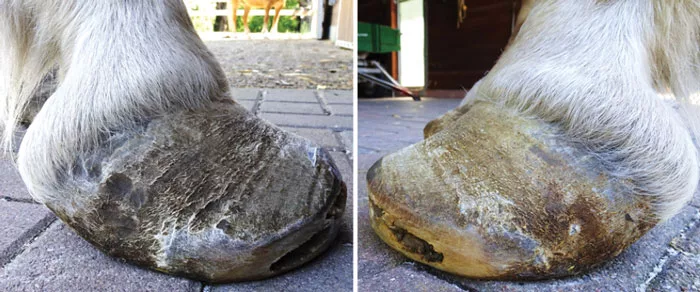
Several disorders affecting the hooves can be an indication for a partial hoof wall resection. However, high risks and harmful side effects are associated with a loss of supporting hoof wall, so the hoof must be stabilized and protected to promote successful healing.

This article shall provide an overview of indications for hoof wall resections and the application of hoof casts based on four case reports. Some general information will be offered first.

In general, indications for hoof wall resections are given if severe hoof wall separations occurred, combined with a loss of function and risk of exacerbation of the disorder or secondary damages of sound structures. Moreover, excessive scar tissue causing pressure on enclosed structures of the hoof capsule might be a reason to remove parts of the hoof wall. Specifically, the following disorders can be indications for hoof wall resections:

  • Chronic laminitis.
  • White line disease.
  • Chronic and profound cracks.
  • Injuries of the hoof wall/avulsion.
  • Keratoma.
  • Abscesses.
  • Perforation of the hoof with acute objects.

The main problems associated with hoof wall resection are the loss of weight-bearing, protection and function suspension of the hoof wall. This often causes pain because of increased sole pressure, stress on the distal phalanx with the risk of bone loss, lameness, as well as leverage on remaining parts of the hoof wall that can cause cracking and destabilization of the hoof capsule. One helpful measure to reduce, avoid or even cure these problems is the application of a hoof cast.

  • Advantages of cast application include:
  • Stabilization of the hoof wall.
  • Relief of the sole.
  • Relief of the distal phalanx.
  • Restriction of hoof deformation and movement.

A hoof cast stabilizes the hoof after wall resection, relieves the distal phalanx and the solar dermis to help the sole recover and protect the distal phalanx in horses with chronic laminitis and promotes healing of coffin bone fractures.

Cast application differs depending on the disorder. The conventional way and intention of casting are meant to stabilize fractures. At the hoof, this means that the lateral movement of the heels and the lowering of the sole and the frog need to be restricted to reduce motion and dislocation of the bone fragments for optimal healing.

In this case, the cast is attached to the hooves by soaking the bandages with warm water, evenly wrapping it around the hoof capsule and letting the horse load the affected limb during hardening of the cast. This creates an even ground surface and easily allows nailing an aluminum shoe to reduce wear of the cast material. If made like this, cast material is pressed into the sole arc of the hoof and causes maximum reduction of hoof movement.

In horses suffering from laminitis, founder and/or rotated distal phalanxes or in horses with thin, sensitive soles, this hoof cast application can cause pressure and discomfort. If extensive hoof wall resection is performed, the bearing function of the removed hoof wall needs to be substituted and it is critical to avoid sole pressure and harming the distal phalanx. For this indication, the author recommends the following way of hoof cast application:

1. Trim the hoof to enable optimal function and weight-bearing.

2. Resection of the loose or diseased hoof horn.

3. Careful cleaning of the sole and the frog.

4. Clean the remaining hoof wall with the fine side of the rasp or sanding sponge.

5. Degrease the hoof wall (acetone-free).

6. Prepare material for casting.

  • Work gloves and rubber gloves.
  • One or two cast bandages with an appropriate width (5 cm for small hooves, 7.5 cm for regular hooves, 10 cm for large hooves). It is recommended to have another cast bandage as a substitute, in case you lose one bandage due to a mistake.
  • Magic Cushion, copper sulfate or another disinfectant.
  • Compresses.
  • Hoof glue (polyurethane or methylmethacrylate/cyano-methylmethacrylate adhesive), glue gun, aerator, mixing vessel, wooden pick.
  • Warm/hot water.
  • A litter.

7. Lifting the hoof by another person.

8. Putting gloves on.

9. Applying Magic Cushion and, if required, another disinfectant on the sole. Disinfection is crucial. Never apply a hoof cast without disinfectant. In the author’s experience, Magic Cushion is enough to avoid thrush of the frog, the white line or the solar horn. It can be combined with copper sulfate. Be careful, though. Do not use too much Magic Cushion. If pressed between the cast and the hoof wall during load, it might reduce the adhesion of the cast at the hoof capsule.

10. If necessary, put compresses at parts of the sole/frog where you want protection or cushioning

11. Apply hoof glue at the hoof wall. You do not have to wait for the glue to set. The hot bandages connect with the glue and the hoof when you start wrapping the cast around the hoof.

12. Evenly wrap the cast around the hoof. Try to have the same strength of material at all parts of the wall and the sole. You do not have to take care of the coronary band or the bulbs at this moment.

13. Letting the cast harden on the lifted hoof. It is important to wait until the cast is completely hardened. The aim is to have a small gap filled with Magic Cushion or the compresses between the sole and the cast material to reduce pressure at the sole. If you let the horse stand on the unfinished cast, the material is pressed at the sole arc and does not allow optimal recovery of the sole or relief of the distal phalanx. The only disadvantage of this measure is that you will not achieve a plane solar surface of the cast, which makes it difficult to nail a shoe on.

14. Cut the cast with a knife, or better, the thin side of the rasp to free the coronary band and the bulbs. It is recommended to avoid casting higher than two-thirds of the hoof wall, except for specific indications. The soft tissue of the bulbs needs to be free from the cast to avoid pressure, injuries or irritation of this area.

15. Put a thin layer of glue on the edge of the cast to seal the hoof against the permeation of water or dirt.

16. Apply hoof glue or nail an aluminum shoe at the solar surface of the cast to protect it against wear.

If the cast is applied in this manner, it allows maximum relief of the sole and the distal phalanx. An “external” suspension of the hoof is created that helps horses with loss of internal suspension of the distal phalanx due to laminitis or with thin and sensitive soles.

Still, a cast also has several side effects.

  • Restriction of hoof movement.
  • Heel contraction.
  • Narrowing the hoof.
  • Irritation of the bulbs and soft tissue.

These side effects require careful monitoring and hoof cast changes at appropriate intervals. If the hoof wall is almost complete, narrowing the hoof is one of the main problems. The author recommends changing/removing the cast in an interval of two, 4-5 weeks. If more than the distal  of the hoof wall is resected, the cast can remain 5-7 weeks on the hoof.

Still, be careful. Fine and already narrow hooves are more prone to contraction. Sometimes it is not possible to apply the hoof cast more than one or two times without the risk of structural changes of the hoof. However, in some cases, you must take this risk to enable healing of the hoof.

The following four cases are presented to demonstrate the application of a hoof cast in the context of hoof wall resection. The use of hoof cast to stabilize fractures will not be explained since it is a common and well-known treatment.

Case 1: Chronic Laminitis

This case involves an 11-year-old Haflinger with a 7-year history of chronic laminitis with poor or missing treatment. At the initial introduction, the mare was almost unable to walk and affected by severe pain. She was barely able to lift one hoof. Sedation and local anesthesia were required to perform the first treatment.

A closer look at the front hooves showed a wide separation of the dorsal and lateral hoof wall from the underlying scar tissue (Figures 1a-f). The distal phalanx was foundered and rotated. The acting dorsal leverage also caused rotation of the hoof capsule. Full weight-bearing affected the thin and damaged sole. The tip of the distal phalanx was close to breaking through the sole. Only the bars and the heels were included in weight-bearing.

Hoofwall-Hagen_Fig_1a-f.jpg

Initial status of the hooves, viewed from the lateral sides of the right (1a) and left (1b) hooves, viewed from the front of the right (1c) and left (1d) hooves and viewed from the sole of the right (1e) and left (1f) hooves.

The main objective was relieving the sole and the distal phalanx and reducing the leverage acting at the hoof wall and the deep digital flexor tendon. On the other hand, it was crucial to protect the distal phalanx from damage and bone loss. It was decided to remove the loose and separated hoof wall (Figures 1g-k).

Hoofwall-Hagen_Fig_1g-k.jpg

The right (1g) and left (1h) hooves after hoof wall resection (1i right hoof, 1k left hoof).

Subsequently, a hoof cast was applied as described above (Figures 1l-q). The point of this cast application is that the hoof acts as a kind of external suspension. The rotated or founded distal phalanx experiences very little pressure and the sole can recover. Since there is no hoof wall in the distal half of the hoof, the side effect of narrowing the hoof is not relevant. Three days after the first cast, the mare was running in the paddock.

Hoofwall-Hagen_Fig_1l-q.jpg

The application of hoof cast material to the right (1l,1n,1p) and left (1m, 1o, 1q) to hooves.

The initial cast was changed after 6 weeks. This was repeated five times with intervals of 8 weeks. The mare developed well and the lameness decreased over time (Figures 1r-u).

Hoofwall-Hagen_Fig_1r-u.jpg

Development of the right hoof from the first presentation (1r), after hoof wall resection (1s), 6 weeks later (1t) and 8 weeks later (1u).

After a little less than 1 year, the mare could be shod with normal shoes combined with pads and packing (Figure 1v). Today, she is sound and ridden by small children.

Hoofwall-Hagen_Fig_1v.jpg

Application of orthopedic shoeing with pads and packing 10 months after hoof wall resection.

Case 2: Keratoma

The second case describes a horse that had a keratoma surgery 2 months previously with poor orthopedic care. The wound had badly healed and because of missing suspension of the distal phalanx experienced severe rotation and founding (Figures 2a-f), as well as severe bone loss. There were only very few millimeters of sole underneath the tip of the distal phalanx. The acting leverage pulled the wall apart. The horse was a 3/5 on the AAEP lameness scale.

Hoofwall-Hagen_Fig_2a-f.jpg

Initial presentation of the left hoof 2 months after the first surgery with the side walls pulled apart, excessive scar tissue viewed from the front (2a) and with medial sinking of the distal phalanx visible in the radiograph (2b). Viewed from lateral (2c), the corresponding radiograph shows little space between distal phalanx and sole (2d). Viewed from the sole with the gap of horn at the wall and the sole (2e) and the bone loss at the distal phalanx in the radiograph (2f).

After cleaning the scar tissue, a new or not completely removed keratoma became visible (Figure 2g). It was decided to repeat the surgery to achieve a complete resection of the diseased horn (Figure 2h). The wound was treated with disinfection and antibiotics. Compresses were applied to the wound before applying the cast to protect the dermis against heat, glue or any other irritation.

Hoofwall-Hagen_Fig_2g-k.jpg

Initial presentation of the left hoof 2 months after the first surgery with the side walls pulled apart, excessive scar tissue viewed from the front (2a) and with medial sinking of the distal phalanx visible in the radiograph (2b). Viewed from lateral (2c), the corresponding radiograph shows little space between distal phalanx and sole (2d). Viewed from the sole with the gap of horn at the wall and the sole (2e) and the bone loss at the distal phalanx in the radiograph (2f).

After the cast was hardened, a treating window was cut into the cast to enable daily control and treatment of the wound (Figure 2i). The cavity was filled with compresses and a thin steel plate was adjusted and screwed on the cast to put pressure on the dermis (Figure 2k). An alternative solution is to tightly wrap flexible, adhesive bandages around the cast and compresses.

The horse showed a moderate lameness 1/5 AAEP the first 3 days, then was sound. After 4 weeks, the cast was renewed. The wound was keratinized and the sole was thicker (Figure 2l). It was not necessary to cut a window in the cast (Figure 2m).

Hoofwall-Hagen_Fig_2l-o.jpg

The healing progress is illustrated. The hoof 4 weeks after surgery (2l) with a new cast (2m). The hoof 13 weeks after surgery (2n) and 25 weeks after surgery (2o).

The second cast was changed 7 weeks later. The horn was growing straight distally and healing was progressing (Figure 2n). The horse was not lame and returned to pasture. The side effect of narrowing the hoof was intended to avoid wall separation. The next change was 8 weeks later, revealing continued improvement (Figure 2o). Even the coronary band was more parallel to the ground. It is assumed that approximately three more cast changes are required until orthopedic shoeing can be applied.

Case 3: White Line Disease

The third case is an 8-year-old warmblood horse with bilateral, chronic white line disease. The owner and farrier complained that the horse is lame after shoeing since the shoe can just be placed at the sole and the horse loses the shoes every few weeks.

After careful examination of the hooves, it became visible that the separation of the white line is approximately 2 cm (0.79 inches) wide and 4 cm (1.6 inches) deep at both hooves (Figures 3a-b). The sole arc collapsed and the sole moved with thumb pressure. This sensitive sole was not able to bear weight. Barefoot the lameness significantly increased.

Hoofwall-Hagen_Fig_3a-b.jpg

The right (3a) and left (3b) hooves show a wall separation at the white line reaching from heel to heel.

The separation reached from heel to heel. The wall did not fulfill its weight-bearing function anymore. The horse was bilaterally lame 2/5 AAEP. No previous treatments of cleaning the separation, daily disinfection or gluing had succeeded. The owner agreed to re-sect the loose wall. Approximately one-quarter of the distal hoof wall had to be removed to reach sound and tightly connected horn (Figures 3c-d).

Hoofwall-Hagen_Fig_3c-d.jpg

The right (3c) and left (3d) hooves are shown after resection of the loose hoof wall.

Subsequently, a hoof cast was applied to both feet as described above (Figures 3e-f). The cast was glued at the available rest of the hoof wall. Again, the narrowing effect of the cast was intended to avoid any leverage pulling at the growing hoof wall or the white line. The side effect enables tightly connected growth.

Hoofwall-Hagen_Fig_3e-f.jpg

Hoof cast application of the left hoof.

The hoof cast was changed every 7 weeks over four cycles. A shoe was nailed and glued to the second cast to allow the horse to live in the pasture. After this time, the hooves were completely recovered and could be shod with pads and packing (Figure 3g). This shoeing protocol was maintained until recently since the risk of a new wall separation is high.

Hoofwall-Hagen_Fig_3g.jpg

The left hoof is shown 35 weeks after the hoof wall resection and before the first shoeing.

Case 4: Thin and Sensitive Soles

The application of a hoof cast as described in this report is also useful in horses with thin, sensitive or broken soles. The only difference to the cases described above is that the narrowing effect of the cast is unintended and could cause secondary hoof damage that’s worse than the initial problem. This side effect limits the application of the cast to 1-2 times with intervals not longer than 2-3 weeks.

The last case is a heavy warmblood horse with long-term acquired bilateral club feet. The former farrier was afraid to shorten the heels, increasing the hoof angle (Figures 4a-b). The pastern axis was broken forward. In addition, the dorsal hoof wall was broken and not included in weight-bearing. The pressure affected the dorsal sole. The horse showed severe lameness 4/5 AAEP.

Hoofwall-Hagen_Fig_4a-b.jpg

Right (4a) and left (4b) club foot with broken dorsal hoof walls due to increased pressure at this region.

After examination, the heels were substantially shortened, which enabled severe re-orientation of the foot with improved pastern axis and less load at the dorsal aspect of the hoof (Figures 4c-d).

Hoofwall-Hagen_Fig_4c-d.jpg

The right (4c) and left (4d) hooves after trimming.

After trimming and cleaning the sole, cracks and bruises in the region under the tip of the distal phalanx became visible (Figures 4e-f). The sole was extremely thin and sensitive in this area. Due to the steep orientation of the distal phalanx and increased pressure at the dorsal aspect of the hoof, the described pathologies developed.

Hoofwall-Hagen_Fig_4e-f.jpg

The sole of the right (4e) and left (4f) hooves after cleaning show cracks and hemorrhages.

In addition to the reorientation of the toe, the main aim was to protect the bone and to relieve the sensitive sole to enable recovery. For this reason, a hoof cast was applied twice over 4 weeks 
(Figures 4g-h)

Hoofwall-Hagen_Fig_4g-h.jpg

Application of the cast of the right (4g) and left (4h) hooves.

The horse was allowed to go on the pasture. It was not lame anymore after 2 weeks.

After the first interval, the sole was stronger and no longer sensitive (Figures 4i-k). After the second interval, the dorsal hoof wall was strong and sound enough to allow shoeing with pads and packing (Figures 4l-m). The shoeing could be reverted to the standard protocol after 6 weeks. 

Hoofwall-Hagen_Fig_4i-m.jpg

Figures 4i-m illustrate the development of the hooves. Four weeks after the first cast application with thicker sole at the right (4i) and left (4k) hooves and 4 weeks after the second cast application with each foot showing sound and strong dorsal hoof wall at the right (4l) and left (4m) hooves.