Article last updated: April 6, 2021
Long toes are a common problem that must be addressed to avoid a multitude of possible injuries to the horse.
“Backing up the toe” is the main concern that appears simply by removing length from the toe, setting the shoe back off the toe, adding a modification for breakover (rolled toe, rocker toe, etc.) or any number of other ideas.
While this might make the foot look aesthetically pleasing, 6 weeks later all the work that was done previously needs to be done again. Focusing on just the toe leaves out the rest of the foot. Instead of thinking of backing up the toe, the focus needs to be on “backing up the whole foot.”
British farrier Simon Curtis explains that, “Most of us understand that we need to get the toe back where it belongs, but what is less understood … is how we need to dress the heels back.”1 In order to understand how the heels affect the toe, think of the hoof wall as a chain that has been laid on a table. If you pull out the front of the chain (simulating a long toe), the back of the chain comes together and begins to move forward. This illustrates that the heels follow the toe. Therefore, it makes sense that if the heels are brought back to the highest and widest part of the frog, the toe will be easier to control when running forward.
When viewed from the side, feet that are run forward will have a broken back hoof pastern axis (HPA), the dorsal wall will dish and the heels will be well in front of the buttress. A solar view generally will show flares in the quarters, a stretched white line in the toe and the heels will be run forward.
Feet with this pathology can cause strain on the tendons and ligaments, aggravate the navicular bursa, and promote toe-first landing, resulting in heel pain and other lameness concerns. It is imperative to relieve the lever that a long toe creates to avoid injuries in the future.
Moving Back To Front
I like to start in the back of the foot and move forward. Establishing where the heels need to be dressed back to in order to function properly is my first step. By paring the frog, we can find its origin of growth at the buttress. Once the true highest and widest part of the frog (not what is created by “sculpting”) has been found, the heels need to be trimmed back to that landmark. This will ensure that the heels have been brought back far enough to remove the majority of bent horn tubules in the caudal area of the foot, resulting in straight tubules that are functional for bearing weight.
If flares are present, floating them so they will not bear weight will help to bring that distortion out of the foot. Lastly, I will address the toe by not just removing length, but removing depth (if possible).
Sculpting the shape of the toe into the foot from the solar surface will be a valuable guide as to how much to dress off when bringing the foot forward. When dressing the toe back, it is important to dress as much as possible, but not to remove so much as to enter the stratum internum (where the pigment of the foot turns bright white).
If a dish is still present and the stratum internum is beginning to be exposed, you can back up the toe a little farther by angling a rasp about 45 degrees at the leading edge of the foot. However, dressing too much of the dorsal wall will weaken the toe and cause the quarters to flare. At this point, with viewing the foot on the ground, an assessment can be made if a shoe is needed and what, if any, modifications need to be applied.
Probably the easiest and most common way of creating breakover assistance is to set the shoe back off the toe, but it is important to not set the shoe back past the toe pillars. By mapping the foot (Figure 1), the toe pillars easily can be identified.
Start by drawing two parallel lines that extend from each heel to the toe. Where those lines intersect the white line in the toe, place a dot at each point. Draw a perpendicular line that connects the dots in the toe. Where the parallel lines that extend from the heels and the perpendicular line that connects the dots intersect is a fairly accurate representation of where the toe pillars are located.
Gene Ovnicek identified the toe pillars while studying the feet of feral horses. He noticed that these horses had a substantial roll in the toe that began where he later identified as the pillars.
Shoe Modifications. This was substantiated later by Michigan State University equine vet and hoof researcher Robert Bowker when dissecting these feet and counting the laminae attachments. Bowker noted that the area of the toe pillars had a higher density of laminae attachment, which suggests that this area was designed to bear most of the weight in the toe region.2 So if the shoe is set behind the pillars of the toe, the area that was designed to bear weight is not being supported.
After applying a functional trim and mapping the foot, if the proportions from the heels to the center of articulation and center of articulation to toe are not at least 50/50, breakover assistance may be needed. Ideally, it is best to have 60% behind the center of articulation and 40% in front.
Some feet may not need a modified shoe, but for those that do, a few simple shoe modifications can make up for what cannot be achieved in the trim. Many modifications can be applied to the shoe in order to facilitate better breakover, but I would like to discuss some of the most common: rolled toe, rocker toe, full web rocker and a roller motion shoe.
Rolled toe. A simple modification, a rolled toe can be forged into the shoe or applied with a grinder. Generally, this modification will bring breakover back to just before the start of the fullering in a keg shoe. Applying the rolled toe is a very mild form of breakover assistance, but it may be all that is needed for a particular foot. If slightly more breakover is needed, a rocker toe modification can be used.
Once the true highest and widest part of the frog has been found, the heels need to be trimmed back to that landmark…
Rocker toe. According to the American Farrier’s Association, a rocker toe incorporates at least half of the width of the web into the rocker and is turned up about 45 degrees. This modification doesn’t necessarily move the point of breakover farther back than a rolled toe, but it does reduce the lever arm created by a long toe.
Despite incorporating relatively the same amount of breakover as a rolled toe, a rockered toe also will shorten the length of the toe. For this modification to be properly applied, the shoe and the foot must have a perfect marriage.
Before the final burn, begin creating the contour of the rocker toe into the foot, which will allow for a quick burn so as not to over burn the toe area.
The purpose of using a rocker toe (or any type of rocker) is to aid in bringing proportions back into relationship with the center of articulation and the center of weight bearing. In feet with long toes, the center of weight bearing is moved caudally, which places more force behind the center of articulation and causes the toe to act as a lever.

Figure 1
By using mechanics in the shoe (such as a rocker) the lever arm of the toe is reduced, which will bring the center of weight bearing forward. There is an inverse relationship between bringing the foot back and moving the center of weight bearing forward to be closer to the center of articulation, thus reducing the lever caused by a long toe.
Full web rocker. Since there is not much difference between the point of breakover with a rolled toe and rocker toe, a full web rocker or a roller motion shoe will incorporate more shoe and will begin just in front of the center of weight bearing.
To forge a full web rocker, start by using a shoe with side clips, as they will provide a guide to begin the rocker, or without clips, begin in the middle of the second and third nail hole. Take the shoe with the clips pointing toward the ground and allow the toe of the shoe to hang over the near side of the anvil with the base of the clips even with the edge.
Next, tilt the toe of the shoe off the face of the anvil about 3/8 inch. With the shoe at a good red heat, hammer the toe down onto the face of the anvil. Once completed, place the shoe on the face of the anvil (ground side down) and it should easily rock forward with little pressure applied to the toe area. As with the rocker toe, it is necessary to trim this modification to the foot prior to the final burn.
If a full web rocker begins too far back on the shoe, this will cause feet that are run forward to land toe first and then rock back onto the heels. If this occurs, the horse can develop heel pain from extra loading of the heels. This also can cause the horse to “wobble” back and forth on the shoe while standing, resulting in tendon or ligament strain. By applying the full web rocker just in front of the center of rotation of the coffin joint, the “wobbling” or rocking back on the heels will be avoided. However, a much safer option with less room for error is the roller motion shoe.

Figure 2
Roller motion. By incorporating the same mechanics for breakover as a full web rocker, a roller motion shoe (Figure 2) cradles the center of articulation and center of weight bearing, which allows for maximum use of mechanics while stabilizing the foot during the stance phase. This modification can be placed anywhere on the shoe depending on foot type, but knowledge and understanding of foot mechanics, center of weight bearing and distinctions of foot types is required to use them effectively.
To make a roller motion shoe, first identify the center of articulation of the specific foot and forge a full web rocker just in front of that corresponding area in the shoe. Then place the heels of the shoe over the face of the anvil, about
1 1/2 inches from the end of the shoe, in a similar fashion as to how the toe was rockered. Forge the heels on the face of the anvil.
The rocker that is created in the heels should be less of an angle than that of the rocker in the toe. When finished, place the shoe on a flat surface and notice that there is a flat area in the middle of the shoe, which will cradle the center of articulation and the center of weight bearing.


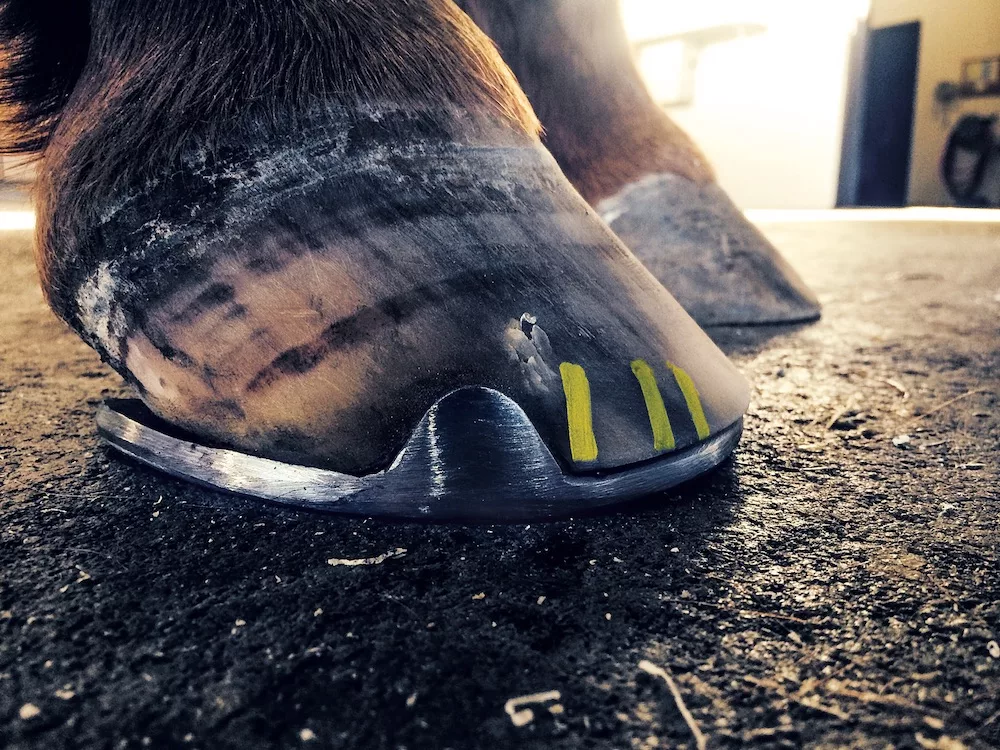
Focusing on merely “backing up the toe” neglects the rest of the foot. Rather, Remington Leach prefers to “back up the entire foot.” Note how far the heels have been trimmed back in the second photograph.
By using this modification correctly, the foot will stabilize itself on the ground and provide adequate breakover to relieve and protect the heels from the ground reaction forces that generally cause heel pain in horses afflicted with long toes/low heels.
In situations where there is not enough depth of foot to trim the contour of a roller motion shoe into the foot, a wedged aluminum keg shoe can be modified to provide the necessary mechanics while maintaining a flat foot-bearing surface. This can be achieved by grinding a roll in the heel and a roll in the toe of the shoe, similar to the mechanics that were forged into the steel keg. Using an aluminum wedged keg shoe and adding the roller motion mechanics with a grinder while maintaining a flat foot-bearing surface is by far the safest way of incorporating this principle.
Through understanding the physics that are constantly acting on the foot and knowing how to use basic shoe modifications, feet that are run forward can be diligently managed. When presented with a case where the toe needs to be backed up, knowing that the whole foot needs to be involved in the process of moving under the limb will yield positive results.
Mapping the foot before and after the trim will give a visual picture of how much breakover assistance is needed. If the foot cannot be backed up enough with just a trim, modified shoes may be used to help assist in breakover and, over time, will allow the foot to take on a better shape and function more efficiently.
References
- Curtis S. American Farriers Journal, Farrier Tips. 29 February 2012. americanfarriers.com/articles/4124-farrier-tips-about-backing-up-that-toe.
-
Ovineck G. Equine Lameness Prevention Organization, Hoof Care Guidelines for Effectively Dealing with Hoof Distortions & Lameness Issues. 10 August 2010. lamenessprevention.org/site_page.cfm?pk_association_webpage_menu=6601&pk_association_webpage=13310.
FARRIER TAKEAWAYS
Rather than focusing solely on backing up the toe, the horse will benefit more from backing up the whole foot.
When the heels are brought back to the highest and widest part of the frog, the toe will be easier to control when running forward.
If the stratum internum is starting to be exposed when removing a dish, you can back up the toe a little more by angling the rasp about 45 degrees at the leading edge of the foot.
If breakover assistance is necessary, it’s important to avoid setting the shoe back past the toe pillars, which can be found by mapping the foot.
Related Content
There may be no single phrase heard more in farrier circles than “backing up the toe.” It comes up in discussions of balance, long toes and low heels, navicular syndrome, caudal heel pain, breakover and numerous other hoof-care topics. But is everyone talking about the same thing?
Understand Breakover and the Implications of Manipulating it
Definitions vary among hoof-care professionals, but improperly influencing it can produce significant problems.
Demystifying the Secrets of Biomechanics and Lameness
Understanding equine biomechanics and how it affects the distal limb is urgently important to your therapeutic work. To help improve your knowledge and outcomes with therapeutic shoeing work, we’ve compiled a detailed collection of proven innovations and practices into an in-depth 39-page eGuide download — and we’ve made it absolutely FREE in order to get it into the hands of as many hoof-care professionals as possible to put them on the pathway to footcare success. Download now »