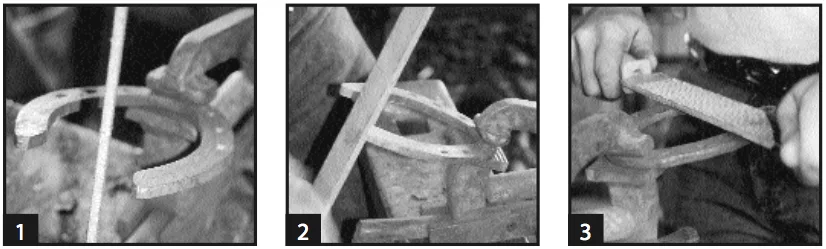
Building good shoes is only part of the skills needed to compete and pass certification tests. Presentation of the finished product is also important.

For my everyday shoeing, I rarely rasp the shoes. Most of what I need to do is done with the hammer. The horse doesn’t care if the surface is shiny and most of my customers look through the fluff anyway. However, if you are building specimen shoes for contests, certification or for a personal display, you want them to look as pretty as possible. Finishing the shoes, as well as the hooves, can also be important for your clients who are entering their horses in shows.

Finishing Starts Early

You should work toward a good finish throughout the forging process. While you can give the shoe a good finish after it is built, periodic brushing while you are still forging will make finishing the shoe at the end easier. Anytime you are doing a forging process that does not move a lot of steel, brushing becomes even more essential. The reason is that the scale (the surface on the steel oxidized by heating) will be broken off if there is a lot of movement of the steel. A toe bend will become fairly clean without brushing because of the amount of movement, while a clipping heat can really ruin the finish.

Another reason to brush during the forging process is to remove anything from the hot steel that can be driven into the surface. Scale and clinker can really pit the surface of the metal if it is not removed prior to being hammered.

Fuel Differences

You will find a big difference between the heat achieved with a coal or coke forge vs. a propane forge. Propane forges oxidize more metal since the oxygen being brought into the forge is not consumed as it is with a coke forge. The fire in a coke forge uses most of the oxygen and so produces less scale.

This is the reason that we are able to weld in a coke forge without flux, but it is next to impossible with a gas forge. Because of this, shoes made in a coke forge are usually cleaner than those made in gas forges. However, they can burn if the fire is not tended with care.

Screen-Shot-2015-12-21-at-24709-PM.png

How To Proceed

Build the shoe and brush at the beginning of every heat. If I am really being picky, I also give the piece a quick brush at the end of the heat before returning the metal to the forge. Make sure that the steel is especially clean before doing any heavy hammering flat against the face of the anvil. This may require an additional brushing in the middle of the heat to avoid hammering the secondary scale buildup into the piece.

Once the shoe is complete, you need to develop a system for rasping the shoe. This is the one I use.

Begin by getting a dark heat on both heels. After a quick brushing, place the toe of the shoe in the vise with the ground surface up and the heels out. Rasp the check (Figure 1) and heel cut (Figure 2). Clean up and soften the edge as far forward as the widest point of the shoe (Figure 3). After rasping, use a half-round file to clean the area just rasped (Figures 4 and 5).

Screen-Shot-2015-12-21-at-24721-PM.png

Turn the shoe over in the vise so that the heels are in the same spot as before, with the hoof surface up. Rasp the heel check, and then box the shoe (Figure 6 and 7). It should already be hammer boxed, so you are just defining the boxing at this point. It is important that there are no sharp edges, so round the sharp outside edge as it occurs from the boxing. Once you are happy with the overall finish, use the file to make it just a little nicer (Figure 8).

Take a dark heat at the toe and place one of the heels in the vise with the ground surface up after a quick brush. Rasp the outside edge of the shoe to remove the sharp edges and take care of the last of any frog eyes that resulted from punching the nails (Figures 9 and 10). Work forward from the widest point of the shoe. Next, take the half-round file and work on the ground surface of the shoe (Figures 11 and 12). Use the rounded side of the file to clean up the inside of the shoe (Figure 13). 

Turn the shoe over in the vise and repeat the steps that you just did on the ground surface (Figure 14).

Once the shoe is filed, take a medium heat on the entire shoe. As soon as you take the shoe out of the fire, brush vigorously with a wet brush (Figure 15, 16 and 17). The water will shock the surface of the steel, breaking the scale free. Brush all surfaces, then make certain the anvil is clean before doing the final forging (Figure 18).

Shape the shoe, then hold it with the ground surface down while you hammer fairly hard with overlapping blows on the hoof surface (Figure 19 and 20). We call this “putting the shoe through the roller mill.” Brush once again with a wet brush. If time allows, place the shoe in a vise for this final brushing (Figure 21). When all this is done, make sure that the shoe is level and shaped like you want it (Figure 22).

Screen-Shot-2015-12-21-at-24735-PM.png
Screen-Shot-2015-12-21-at-24747-PM.png

The Final Touch

Continue to brush until the shoe has a slight blue tint to the shiny metal. This is the best time to quench, since it will leave a pretty coloring to the steel. If you are not in a contest, rub the shoe down with a towel that has either WD-40 or Vaseline on it. This final step is notallowed at most contests, however, I have yet to see a disqualification for it.

Try this on a few shoes until you have a feel for getting the perfect finish. Make a shoe display of your finest work, polished to a high shine.